New Archimesh Blog Post (2020 Update Available) with Tutorial on YouTube
Click here for a YouTube Tutorial covering the features of Archimesh
Take the CourseA quick guide to Archimesh
|
Item |
Description |
|---|---|
|
Elements |
Generates the different Architectural elements including a default material. The different elements get placed at the 3D cursor. Initial properties are displayed in either the properties or tool shelf depending on the element you add. For example room properties are displayed on the properties shelf while Cabinet properties are displayed in the tool shelf. |
|
Props |
Just like the Architectural elements props are added with predefined properties that can initially be edited in either the properties or tool shelf. |
|
Display Hints |
Displays measurements and name data relating to the Architectural elements. The colour, size and separation can be controlled from the tool shelf. Any changes to the dimensions of the element in the 3D view will automatically be updated |
Introduction
Archimesh is an architectural design tool add-on for Blender. The add-on has been available as an externally sourced feature for a good number of years but the recent release of Blender version 2.78a sees a new and improved Archimesh come pre-packed with Blender. You must enable the Archimesh features in user preferences and once enabled a new Archimesh tab becomes visible on the tool shelf. Archimesh provides a method of adding industry standard structural elements to your scene quickly and easily. Both the elements and props regions of the Archimesh tab offer plenty of predefined Tool and Properties Shelf objects to choose from. These elements will be added to the scene at the 3D cursor position. Once elements such as rooms have been added to your scene an initial properties tab displays on the properties tool shelf where you can adjust room sizes, wall thickness etc. These room properties are available to change any time the element is selected in the 3D view. However all initial property settings relating to some of the elements are not accessible once you preform another task.
Pictured Below shows the cabinet properties on the tool shelf and room properties on the properties shelf.

Interested in 3D Design? Check out my Architectural Design Tools in Blender Course on Udemy
Lets take a Look at Adding Rooms
The room element will be added to the scene at the position of the 3D cursor and running along the X axis. The room element is added as a single wall including a base board, with a length of one unit, a height of 2.4 and thickness of zero. Once in the scene you will find the properties relating to the selected wall on the properties tool shelf.
The room options include:
Height: Standard wall height of 2.4
Thickness: Depending on the wall type you want change its thickness or width value to suit your scene
Inverse: Switch the direction the wall faces
Number of walls: Once increased beyond one you will get additional options to add a ceiling, floor or to close off the area with a joining wall.
Each wall has advanced options that allow control of its visibility or whether or not it has a base board. Further options for the wall allow you to curved the wall and control the type of curve by controlling the centre point of the arc.
Baseboard options include width and height. The length is automatically associated with its connected wall.
Wall Cover adds an exterior type cladding and options to control its placement, individual cover height and thickness.
Each element is added with a default Material whether you are using the Blender internal rendering engine or cycles. Each element has a colour assigned for viewport display.
Additional room options including Auto holes now appear on the Tool shelf. This option automatically adds a boolean operation once a door or window element has been placed on one or more walls of the room.
Import and Export are also now available here and allow you to export your custom room properties stored in a (.dat)file. Properties relating to all options of the room design such as the height, width the base board options etc are stored and you can easily import them to your next project. To export select the room you want to export, press the export button and choose a location, give it a file name with extension (.dat)
To import your saved .dat file add a room to the scene, select import, navigate to the file in the browser and select it. The room you added will now be updated with the saved properties inside the .dat file you imported.7
Room from Draw in the pencil tools area of the tool shelf allows you to create a room using the grease pencil. For best result go into a top orthographic view. (7 top view, then 5 to toggle between orthographic and perspective) Use the grid if you want more accurate line placement. Press and hold D for grease pencil, press and hold the left mouse button (right mouse button if you use default select with right option, see user preferences – input for mouse options) and start drawing. Press enter when finished drawing. Put a check mark in ceiling, floor or closed walls to enables those options. Select room from draw and your grease pencil lines transform into actual mesh geometry that can be modified in the properties shelf.
Tip: Use the close walls option in the pencil tools to join the walls for a more accurate result.
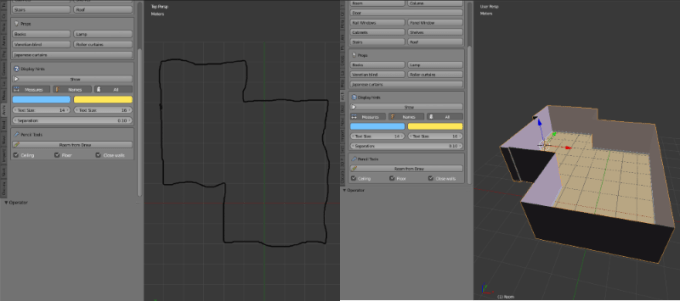
Grease pencil drawing on the left and the resulting room from draw on the right.
Adding and detailing columns
Choose between two column types, circular or rectangular. The column options appear on the tool shelf and depending on the type you can control the height, width, depth or radius.
Columns are added with a rectangular base and cap by default. You can include a circular base and cap with the rectangle option. The circular base and cap are added beyond the rectangular base and cap positions for a true representation of this object.
Create a top arch that rest on the top capital of the column. Increase its overall ratio, thickness, width and y position with the options provided.
Create an array of elements with this built in modifier.
This is a great feature of Archimesh that will allow you to create some very complex structures very quickly. (Pictured Below)

Inserting a Door
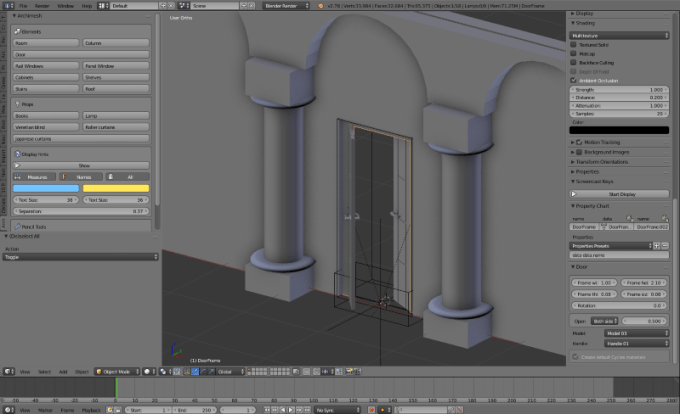
One of the great features is the ability to add a door anywhere in the scene. This feature is particularly useful when added to an Archimesh room that has been modified to have a wall thickness. The room tools area on the Tool shelf contains an auto holes button that will automatically subtract the door element from the room element and inserting a hole. The door properties appear on the properties shelf and you can adjust the door sizes here.
The door element can be left or right or centre opening and you can choose from different styles. The door handles also have four types to choose from.
(Pictured Below)
Adding Windows
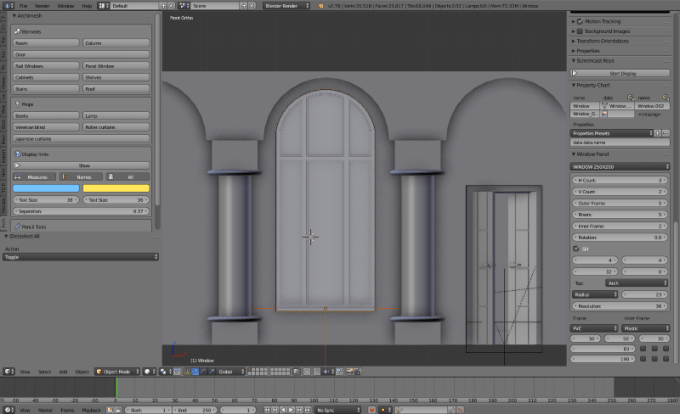
The Archimesh add-on has rail and panel type widows to choose from. The panel window has lots of panel styles including two door styles to choose from. The properties of these window styles allow for a maximum of eight horizontal sections and five vertical. Each of these sections can be adjusted according to the dimension required. The top of the window can be set to inclined, arched, flat or triangle allowing for a multitude of shapes to fit any design. The panel window also has an option for a sill with adjustable dimensions. The window has the option for an internal and external blind with adjustable height and depth settings. You can choose from three different materials and distinguish between the inner and outer frames. The glass panels also have a material applied. (Pictured Below)

Cabinets
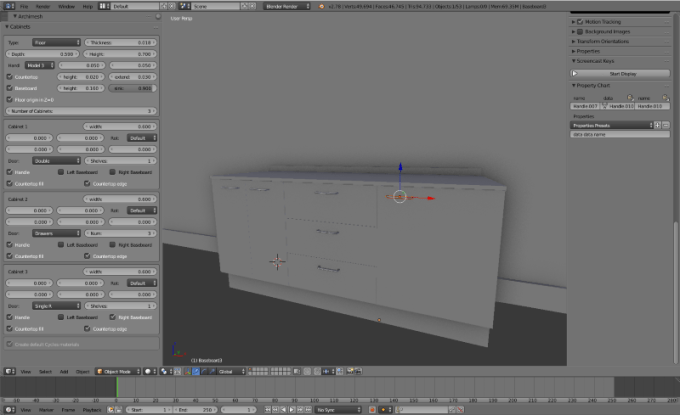
The cabinet properties become available on the tool shelf with a floor or wall type to choose from, with settings to control their dimensions and eight different handle types to choose from. Select to have a counter top with splashback or baseboard included with options for there height and overhang. Select the number of units you want, change their individual sizes, rotation, position and select a door or drawer for each one. The options allow for a wide range of customisation to the cabinets but once you click away from the cabinet in the 3D view and preform another action these options will no longer be available to change. (Pictured Below)
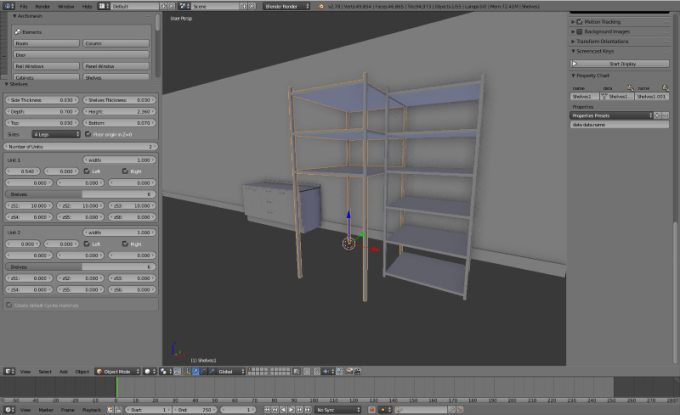
Shelves
Much like the cabinet element shelves have some similar properties with two types to choose from and the properties become available on the tool shelf once a new element is added to the scene. The shelve element has an array modifier available to quickly duplicate the element. Each shelve unit created with the array modifier can be individually modified for a different style and dimension. (Pictured Below)
Stairs
There are two types of stairs to choose from rectangle and round. Quickly increase or decrease the number of steps with options for closed or open sides with variable width. The stairs riser height and thread depth can also be controlled, including the overhang front and sides. This feature of Archimesh really speeds up an otherwise complex and slow process or designing and modelling stairs. (Pictured Below)

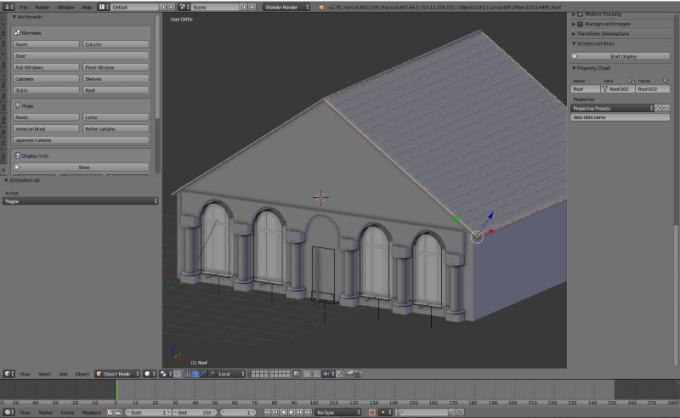
Roof
The roof element is placed in the 3D view laying flat on the grid floor. There are four roof tile styles to choose from and these can be increased in number on the X and Y axis with the ability to scale up or down from the origin point. The tile thickness can be increase or decreased. The slope of the roof element can be altered to suit its position in the 3D scene using the roof slope option. (Pictured Below)
Books
In the props section of the Archimesh tab you will find the book element. This element gets added to the scene as a row of twenty books up to a maximum of one hundred. Ue the dimension properties to control the size of the books. This element has a very useful feature that helps randomise your book shelf. Change the randomness sliders of the x, y, z and rotation to get a more realistic looking array of books on your book shelf.
Lamps
Choose from four default designs or get creative and design your own with control of every segment of these lamps. The properties also allow for full control of the lamp shade with or without pleats. Just note once you click away from the lamp in the 3D view and preform another action these options will no longer be available to change.
Venetian Blind
The properties of this element gets added to the properties shelf. Easily control the dimensions or adjust the angle to open or close the blind.
Roller Curtains
These properties become available on the tool shelf. Use the dimension properties to adjust the width of the blind element or the length it is extended. Just note once you click away from the roller curtain in the 3D view and preform another action these options will no longer be available to change.
Japanese Curtains
The properties elements become available on the tool where you can adjust their dimensions number of rails and panels and the position of each. Once you click away from the curtain in the 3D view and preform another action these options will no longer be available to change.
Display Hints
The display hints are a very useful feature. Display the dimensions and name of an Archimesh element and adjust the size, colour and placement of the text. If you change the size of a wall for example the dimension will update dynamically. (Pictured Below)

Conclusion:
Archimesh is a fantastic built in feature of Blender that will speed up architectural design and eliminate repetitive and sometimes time consuming tasks. The properties relating to each element and prop are detailed enough to give to full control of customisation. There are some small issues you might notice like for example; I scaled the rooms up and applied the scales, later tried to use advance options but the rooms reverted back to their original scale. This was a small issue and I’m sure will be corrected in the future.
Interested in 3D Design? Check out my New course available now on Udemy

great post, keep it up!
It’s 2019 and the scale issue hasnt been fixed… Very Frustraiting!